Tag Archives: westminster

Westminster, CO | Documentary Portraits | Molly & Balloon

With all of the below zero weather this week, I was really longing for some summer sun. I went back through some of my photo shoots from last summer and pulled these documentary portraits of Molly. They were shot during a concert at the Westminster Promenade in Westminster, CO. Molly was having a great time playing with the black balloons while staying in the shade of the Westminster High School tent.

The dark tent overhead, with light streaming in from all sides, made for some beautiful light; and the dark balloons next to Molly’s light skin created really interesting contrast in the images.

You can click on any of the images to see them larger. Enjoy…

Tech Info:
Natural Light

Nikon F3
Nikon 50mm f1.4
Ilford HP5 Plus
Ilford Ilfotec DD-X (9min @ 20C)

Camera Scan
Sigma SD9
Sigma 50mm f2.8 Macro
Photosolve Xtend-a-Slide

Northglenn, CO | WHS Senior Portrait Session | Collage

Here is a collage that Breanna asked me to create using her favorite images from our Senior Portrait session this summer. This image is pretty different from the work I usually put up on the blog – I tend to lean more towards black and white images on simple backgrounds. But this was a fun project, and it shows the variety of opportunities that are opened up with technology.

Having been out of high school for more than a few years, I didn’t know that collages were “a thing”.  Now that I have had my eyes opened to the possibilities, I am definitely interested in where they may lead. Collages seem to be a great way to showcase a wider variety of imagery and include some of the “edgier” pictures that might never see the light of day in the traditional world of 8X10’s hanging on the wall.

Anything that lets people see portraiture in a new context, and exposes them to interesting imagery, is okay in my book. What are your thoughts?

You can click on the image to see it lager. Enjoy…

Tech Info:
Collage created in Adobe Photoshop CS5
Images are a mixture of film (Fuji Pro 400H) and digital (Nikon D70s) captures

Westminster, CO | Documentary Photos | WHS 2009 Las Posadas

With the Holidays upon us, I wanted to put up some documentary pictures that I shot last year at Westminster High School’s Las Posadas celebration/parade/march. The event was a lot of fun, it included Mary, Joseph and even a real donkey. There were candles, guitars and lots of singing. The large crowd moved from church to church through the old town area of Westminster and ended up back at the high school for refreshments after the march.

It was pretty cold, and very dark, so photography was a challenge. I wanted to document the event, but using flash would have been very intrusive and would have looked awful – red eyes and blown out faces with pure blackness in the background. Instead, I chose to shoot in the available light (err – darkness). I utilized the  highest ISO the camera would allow and then under exposed by about a stop, and I also used my fastest lens. It was too dark for the camera to auto-focus (without an annoying AF assist lamp) , so manual focus was the order of the day.

Even though these pictures are very grainy, I think they do a good job capturing the spirit of the event. They are authentic. They illustrate the setting of the event – the cold and dark of a December night, punctuated by the warmth and light of community and candlelight.

You can click on any of the images to see them larger and read a caption. Enjoy…

Tech Info:
Nikon D200
Nikon 50mm f1.8
ISO 3200 (underexposed, so more like 6400)
It was DARK!

Westminster, CO | Documentary Photos | Friday Night Lights

This is a series of pictures from Westminster High School’s homecoming football game back in October. My goal was to go out and capture the atmosphere of a high school football game, rather than document the game itself.

To accomplish this, I decided to use my Canonet QL17 GIII. The little rangefinder with a fixed 40mm lens. Using this camera meant that I couldn’t get caught up in shooting typical photojounalistic football action shots. Instead, I would have to focus on the periphery of the game – coaches shouting, players celebrating, officials moving up and down the sideline – all the stuff that goes on during a football game that goes almost completely unnoticed by the crowd.

There are some things that I find really interesting in these images. First is the lens flare caused by having the bright stadium lights in the images. This really seems to capture the glare that you notice when down on the field. Another interesting aspect of these images is the contrast… black uniforms – white numbers, dark sky – bright lights. Finally, there are the relationships – players talking, coaches teaching. If you’ve never been on a football field these can be easily overlooked, but they are as essential to the game as touchdowns, helmets or big hits.

You can click on any of the images to see them larger and read the captions. Enjoy…

Tech Info:

Canonet QL17 GIII
Canon 40mm f1.7 lens (fixed)
Legacy Pro 400 (AKA – Fuji Neopan 400) – pushed one stop (ISO 800)
Ilford Ilfotec DD-X Developer (10min @ 20C)

Camera Scan
Sigma SD9
50mm f2.8 Macro
Photosolve Xtend-a-Slide

Westminster, CO | Documentary Photo | The Kids Are All Wet

Here is a fun documentary photograph to kick off the weekend. Back in September, the family and I went to a free concert at the Westminster Promenade in Westminster, CO. While following Emma around to make sure she didn’t cause too much trouble, I noticed the kids playing in this fountain.

As the sun got lower in the sky the light got better and the scene got more interesting. Also, most of the kids started to clear out, and I was able to get this one frame with a couple of kids in just the right spot. It was really an exercise in anticipation and patience.

Wait for the light to be low enough to back light the water and silhouette the kids – Wait for just a couple of kids doing something interesting – Make sure no one is walking through the background – Anticipate the moment when the water is shooting to its highest point – CLICK! One shot, one good frame is all I was able to get. In the next frame, the bright sunlight was gone and the kids had moved together to make one black blob instead of two distinct silhouettes.

I guess this was one of those times when a snap-shot wasn’t really a snap-shot.

You can click on the image to see it larger. Enjoy…

Tech Info:
Nikon F3
Nikon 50mm f1.4
Ilford HP5 Plus
Ilford Ilfotec DD-X (9min @ 20C)

Camera Scan
Sigma SD9
Sigma 50mm f2.8 Macro
Photosolve Xtend-a-Slide

Documenting Your Family | Photo Tips | Get Closer

“If your pictures aren’t good enough, you’re not close enough.” – Photojournalist Robert Capa

Robert Capa was a war photographer who was well known for always being right in the middle of the action. He was killed by a landmine while photographing the First Indochina War, on May 25, 1954. His quote above is a reminder for us to get physically closer and become more intimate with those we are photographing. Capa did not accomplish this through the use of long lenses (not in common use prior to 1954), but through proximity.

Getting closer accomplishes a few things:

It lets us understand what is going on and lets our subjects get used to us being around and having a camera. If you stand on the edges of the action and use a long lens to capture images, this will often draw attention and even suspicion. If you are comfortable and involved, people will start to forget about the camera and you can document truly candid moments. Photographing your own family makes this really easy, you are a supposed to be there, all you have done is add a camera to the mix.

Getting closer and using a wide angle lens will allow you to incorporate background into an otherwise intimate photograph. This gives the image a sense of place and tells the viewer what was going on at the time the picture  was captured. This type of picture is often called an environmental portrait.

If you get close while using a normal or short telephoto lens (the max I routinely use is an 85mm) you are able to remove much of the background or turn it into a pleasing blur. This focuses the viewers attention on your main subject and can make for a powerful photograph.

Getting close and being involved with your subjects gives you far more options in terms of lighting and background/foreground elements. If you are standing back and shooting with a long lens, you are pretty much stuck with whatever light direction and elements happen to line up in your frame at the time the shutter is tripped. If your subjects are comfortable with you, and you can move in among them, you can position yourself so there is attractive light, a cool foreground element in the frame, or nice tones/colors in the background. The choice is yours, it is not being dictated by your location or your long lens.

Finally, a note on cropping. As you can see in the image above, you do not always have to show a person’s whole head in a close up portrait. In this portrait, I was really interested in Emma’s wavy hair and the flower pattern in her shirt. I came in close with a 50mm lens (equal to an 85mm on 35mm film) and only shot the right side of her face and included her hair and her shoulder. What did this technique accomplish?  It brought attention to the elements that I was interested in documenting, it excluded the dark shadows on the left side of her face, and it created a pleasing off center composition. Also, the distracting background was reduced to a soft blur.

I hope you find these tips helpful, give them a try and let me know what you think.

Tech Info:
Sigma SD9
Sigma 50mm f2.8 Macro
1/350 sec, f/3.5, ISO 100
Converted to B&W in Adobe Camera Raw

Westminster, CO | Self Portrait | Set-Up & Execution

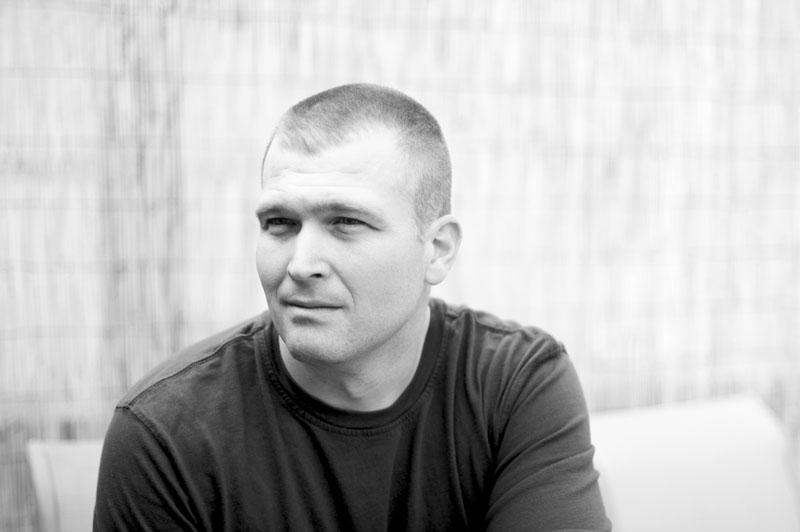
The image at left is a recent self portrait. To give you some ideas about things to consider before a portrait shoot, I thought I would try to give you some insight into my thought process on setting up this shot, and details about the actual execution of the shoot.

To start, I am not crazy about the typical “photographer holding a camera while looking in the mirror” self portrait. It can be very limiting in terms of both location and lighting. Instead, I wanted a portrait in a real location using available light. This is my standard operating procedure for any other portrait, why should a self portrait be any different?

As a location, I chose the back deck on my home in Westminster, CO. My family and I spent a good portion of the early summer refurbishing and adding on to the deck, so I thought it would be an ideal location. The north end of the deck is only a few feet from my neighbor’s yard, so we put up six foot reed fencing along this railing to provide privacy. The reed fencing served as the background that you see in the image. Now, if a fence on the north end of the deck served as the background, that tells us that I was facing South when the image was exposed. Normally this wouldn’t be an ideal lighting situation. Fortunately, I planned ahead and shot this image in the late afternoon, and my house blocked the direct light from the sun. So I was lit by the open sky, and fill light was provided by the light gray walls of my house.

For wardrobe, I chose a medium blue shirt. I wanted something that would separate from the background, but would not be too dark and contrasty. Also, I had a haircut a couple days before the shoot. If I go too long without a haircut, my hair naturally grows to a point and it starts to look like I am trying for a mohawk.

For this self portrait, I knew that I wanted to use shallow depth of field to blur the background and draw attention to my eyes and face. To accomplish this, I decide to shoot the image digitally. Using the self timer to expose the image, and shooting film, I wouldn’t know if the pictures were in focus until I got the film back from the lab.

To create the image, I set up my Nikon D70s on a tripod with a 50mm f1.4 lens attached. I set the ISO to 200, the aperture to f1.4 and the shutter speed to 1/1600 of a second. In the shot, I am sitting in a chair and leaning forward on our patio table (the table is not visible). I pre-focused the lens on the edge of the table and then recomposed the shot to cut out the table and give some room above my head. Finally, I set the self timer for 10 seconds, pushed the shutter release and ran over to my chair and sat down. I then leaned in and tried to position my eyes directly over the edge of the table. Before the shutter tripped I just needed to put on an expression that didn’t make me look like a total dork, no easy task. I eventually ended up going through this series of steps about ten times to get a few frames that I liked.

A couple of things that I particularly liked about this frame. I am looking off camera which seems a little more natural, and I only have a half smile, making me seem approachable but not too dorky. Also, this frame looks good as a horizontal (how it was shot), or cropped as a vertical or square…

Jason Noffsinger Self Portrait This is something important to think about when you will be repurposing the image across the web.

You can view the image “in action” over here on my About page, or on my Facebook fan page.

Tech Info:
Nikon D70s
Nikon 50mm f1.4
ISO 200, f1.4, 1/1600
B&W conversion in Adobe Camera Raw

Westminster, CO | Haircut+Warm Spring Day=Park Photo Shoot

Back in the spring, my daughter Molly got a nifty new haircut. A warm spring day and a delivery of fresh film provided a great opportunity for a photo shoot. We just took a quick trip over to our local park – Nottingham Park in Westminster, CO – and shot all these pictures in about twenty minutes. There is a pretty short window of opportunity when working with a two year old, especially when it’s your own two year old.

There are a few things that I really like in these photos:

  1. Molly’s pixie cut
  2. The vertical bars on the playset vs. the horizontal stripes on Molly’s dress
  3. All of the different settings that we were able to incorporate into the images
  4. Molly’s interaction with her surroundings as well as with the camera

You can click on any of the pictures below to see them larger. Enjoy…

Tech Info:
Nikon N90s
Nikon 50mm f1.8 lens
Fuji 400H film
Straight scans from Richard Photo Lab